1 | 文章首发于先知 https://xz.aliyun.com/t/3724 |
前言
上一篇文章主要讲解了论文中具有代表性的模块的代码实现,这一篇文章主要讲论文的整体架构和处理流程,包括数据生成,数据收集,数据处理等。
整体架构
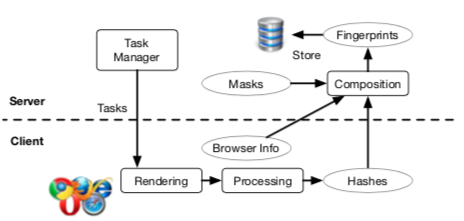
1.后端给前端下发渲染任务
2.前端进行渲染,并且将部分结果进行hash后发送给后端
3.渲染任务同时搜集浏览器信息,设备信息,一并发送给后端
4.后端接收到数据进行处理
5.生成浏览器指纹与设备指纹
6.将指纹存储到数据库,并将指纹打印到前端
模块整合/数据生成
作者使用loader.js进行模块整合,测试项目大概如下1
2
3
4
5
6
7
8
9
10
11
12
13
14
15
16
17this.testList.push(new CubeTest('normal'));
this.testList.push(new CubeTest('aa'));
this.testList.push(new CameraTest());
this.testList.push(new LineTest('normal'));
this.testList.push(new LineTest('aa'));
this.testList.push(new TextureTest(....));
this.testList.push(new TextureTest(....));
this.testList.push(new SimpleLightTest(....));
this.testList.push(new SimpleLightTest(....));
this.testList.push(new MoreLightTest(....));
this.testList.push(new TwoTexturesMoreLightTest(....));
this.testList.push(new TransparentTest(....));
this.testList.push(new LightingTest());
this.testList.push(new ClippingTest());
this.testList.push(new BubbleTest());
this.testList.push(new CompressedTextureTest());
this.testList.push(new ShadowTest());
测试结果利用dataurl传递给toServer.js进行hash处理
例如CubeTest('normal')结果如下
这十多个任务基本用来测试GPU的渲染
然后还有浏览器的字符渲染支持测试1
this.asyncTests.push(new LanguageDector());
将浏览器支持的字符返回给后端
数据收集
对于数据的搜集,作者这里使用了toServer.js,大致代码解读如下
作者对如下数据进行测试和搜集1
2
3
4
5
6
7
8
9
10
11
12
13
14
15
16
17
18
19
20
21
22
23var Sender = function() {
this.finalized = false;
this.postData = {
fontlist: "No Flash",
fonts: "",
WebGL: false,
inc: "Undefined",
gpu: "Undefined",
hash: "Undefined",
timezone: "Undefined",
resolution: "Undefined",
plugins: "Undefined",
cookie: "Undefined",
localstorage: "Undefined",
manufacturer: "Undefined",
gpuImgs: {},
adBlock: "Undefined",
cpu_cores: "Undefined",
canvas_test: "Undefined",
audio: "Undefined",
langsDetected: [],
video: []
};
在调用toServer函数的时候,会传入5个参数,分别是1
WebGL, inc, gpu, hash, id, dataurl
然后进行相应赋值1
2
3
4
5
6
7
8
9
10
11
12
13this.toServer = function(
WebGL, inc, gpu, hash, id,
dataurl) { // send messages to server and receive messages from server
this.postData['gpuImgs'][id] = dataurl.hashCode();
if (WebGL) {
this.postData['WebGL'] = WebGL;
this.postData['inc'] = inc;
this.postData['gpu'] = gpu;
this.postData['hash'] = hash;
}
};
其中的1
2this.postData['inc'] = inc;
this.postData['gpu'] = gpu;
分别来自于1
2gl.getParameter(debugInfo.UNMASKED_VENDOR_WEBGL);
gl.getParameter(debugInfo.UNMASKED_RENDERER_WEBGL);
对于1
2this.postData['gpuImgs'][id] = dataurl.hashCode();
this.postData['hash'] = hash;
来自于如下运算1
2
3
4
5
6
7
8
9
10
11Uint8Array.prototype.hashCode = function() {
var hash = 0, i, chr, len;
if (this.length === 0)
return hash;
for (i = 0, len = this.length; i < len; i++) {
chr = this[i];
hash = ((hash << 5) - hash) + chr;
hash |= 0; // Convert to 32bit integer
}
return hash;
}
这里我们知道dataurl是各种模块渲染的结果传递而来,然后利用hashcode转成数字,得到大致如下结果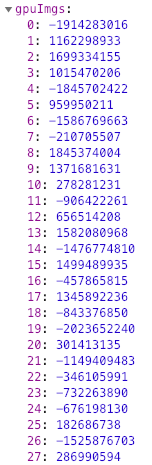
紧接着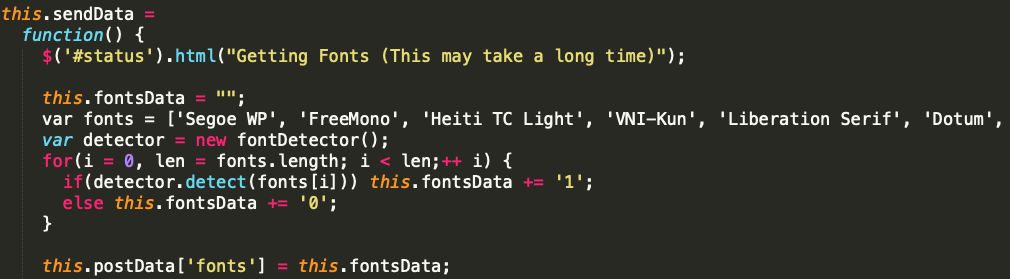
作者对4422种字体进行探测,若支持,则标记为1,不支持则标记为0
得到形如如下的数组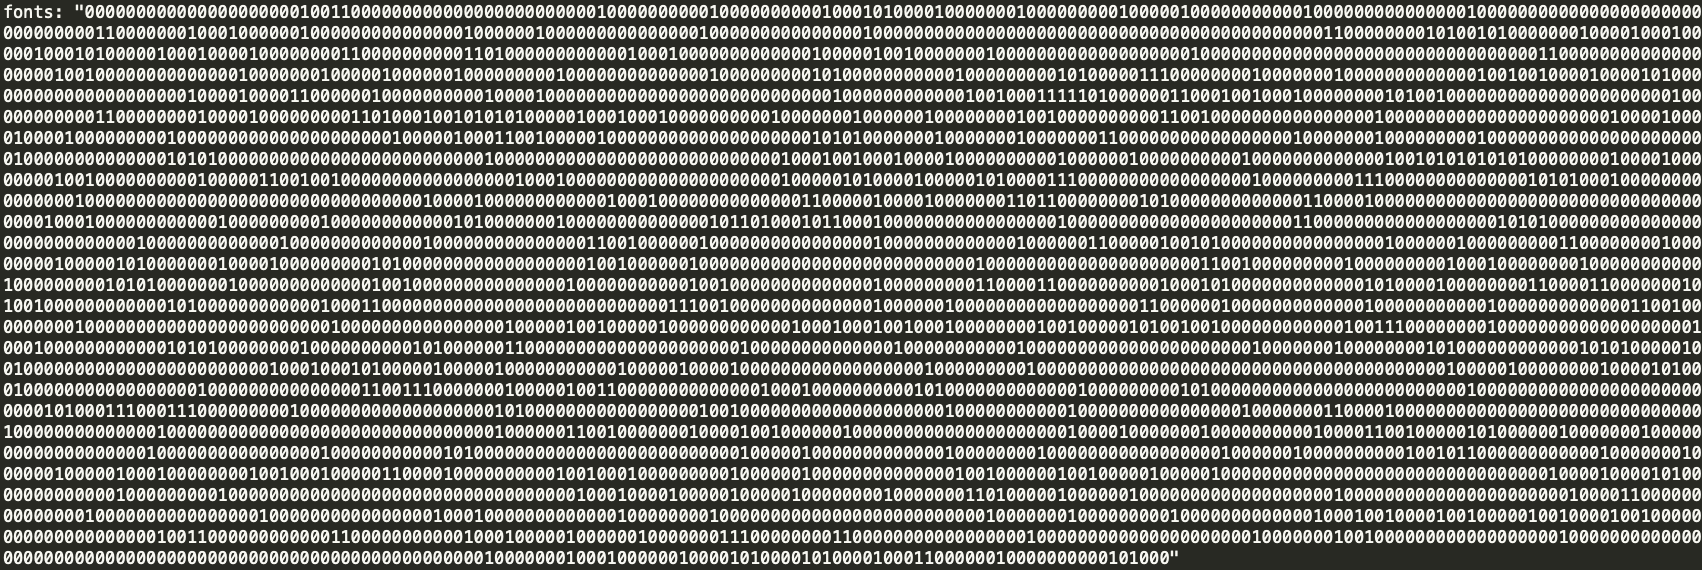
然后有进行了本地时间与 GMT 时间之间的时间差的搜集:
例如我的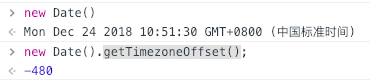
然后作者又搜集了分辨率
这里搜集了浏览器缩放比例,浏览器的页面大小等,如下
缩放比例:80%

缩放比例:100%

浏览器页面大小:小窗和窗口最大化。缩放比例100%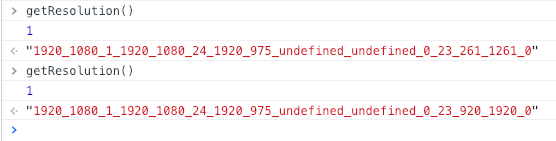
然后作者又使用了navigator对象,获取了如下参数1
2
3this.postData['plugins'] = navigator.plugins;
this.postData['cookie'] = navigator.cookieEnabled;
this.postData['cpu_cores'] = navigator.hardwareConcurrency;
然后又使用了localStorage特性,判断浏览器是否支持localStorage这个属性1
2
3
4
5
6
7try {
localStorage.setItem('test', 'test');
localStorage.removeItem('test');
this.postData['localstorage'] = true;
} catch(e) {
this.postData['localstorage'] = false;
}
最后收集如下信息1
2
3
4this.postData['adBlock'] = $('#ad')[0] == null ? 'Yes' : 'No';
this.postData['canvas_test'] = Base64EncodeUrlSafe(calcSHA1(cvs_test.substring(22, cvs_test.length)));
this.postData['audio'] = audioFingerPrinting();
this.postData['langsDetected'] = get_writing_scripts();
然后将数据发送到指定ip1
2
3
4
5
6
7
8
9
10
11
12
13
14
15
16function startSend(postData){
$.ajax({
url : "http://" + ip_address + "/features",
dataType : "json",
contentType: 'application/json',
type : 'POST',
data : JSON.stringify(postData),
success : function(data) {
data['finished'] = true;
parent.postMessage(data,"http://uniquemachine.org");
},
error: function (xhr, ajaxOptions, thrownError) {
alert(thrownError);
}
});
}
数据处理
后端采用python flask框架编写1
2
3
4
5
6
7
8
9
10
11
12
13
14
15
16
def features():
agent = ""
accept = ""
encoding = ""
language = ""
IP = ""
try:
agent = request.headers.get('User-Agent')
accpet = request.headers.get('Accept')
encoding = request.headers.get('Accept-Encoding')
language = request.headers.get('Accept-Language')
IP = request.remote_addr
except:
pass
但由于是demo,很多功能尚未加入,这里的跨浏览器特性就只用到了2个,难怪稳定性不是很高= =1
2
3
4
5
6
7
8
9
10
11
12
13
14
15
16
17
18
19
20
21
22
23
24
25
26
27
28
feature_list = [
      "agent",
      "accept",
      "encoding",
      "language",
      "langsDetected",
      "resolution",
      "fonts",
      "WebGL",
      "inc",
      "gpu",
      "gpuImgs",
      "timezone",
      "plugins",
      "cookie",
      "localstorage",
      "adBlock",
      "cpu_cores",
      "canvas_test",
      "audio"]

cross_feature_list = [
      "timezone",
      "fonts",
      "langsDetected",
      "audio"
      ]
处理方式也比较简单,没有想象中的复杂
作者简单的通过agent去判断是否为mac,然后加载了不同的mask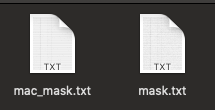
然后利用之前搜集的支持的字体
进行与运算
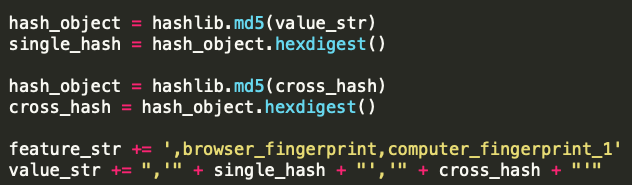
然后作者将所有特性的值字符串化然后拼接在一起,再进行md5,得到哈希值,作为浏览器指纹和设备指纹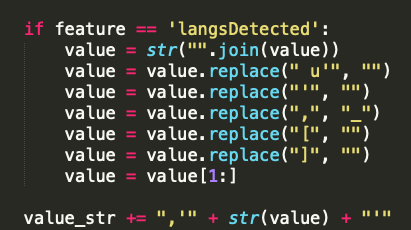

测试结果
因为作者给出了demo网站,我进行了测试
- 同一ip,不同浏览器(Safari,Firefox,Chrome)
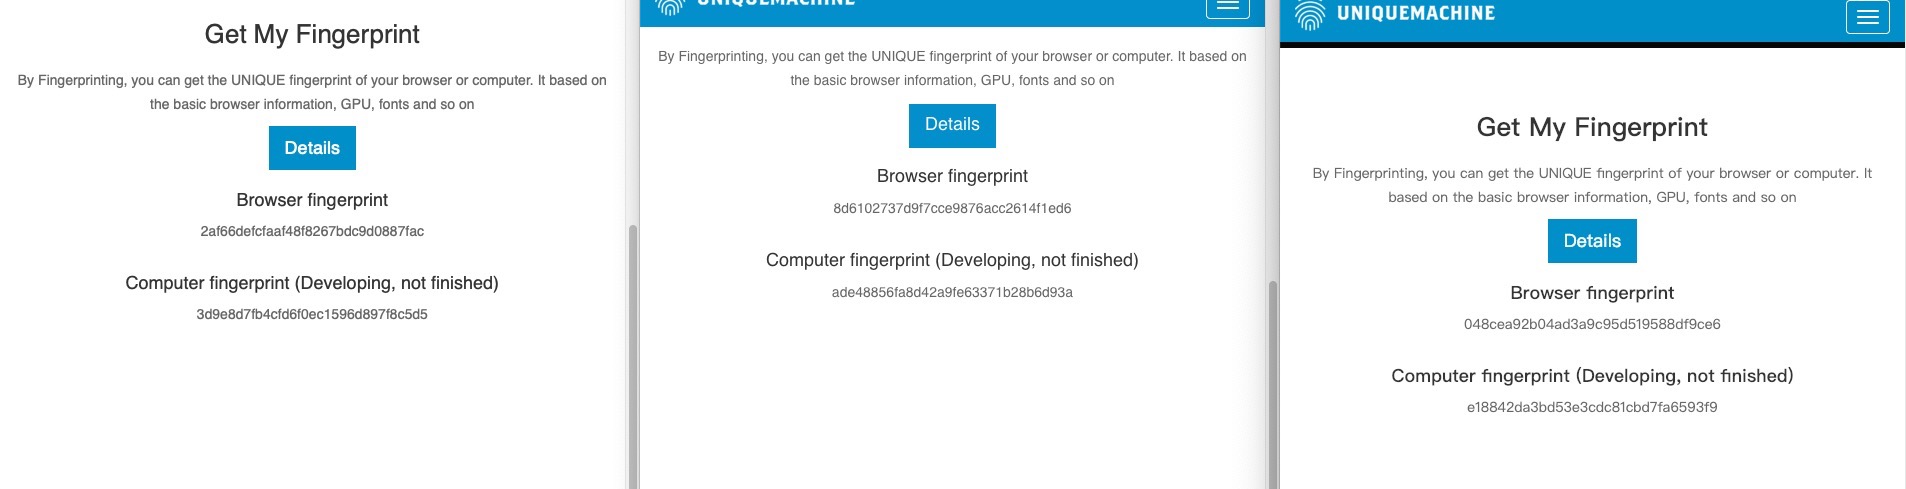
识别都失败了
当然,也有成功的人(Chrome,Firefox)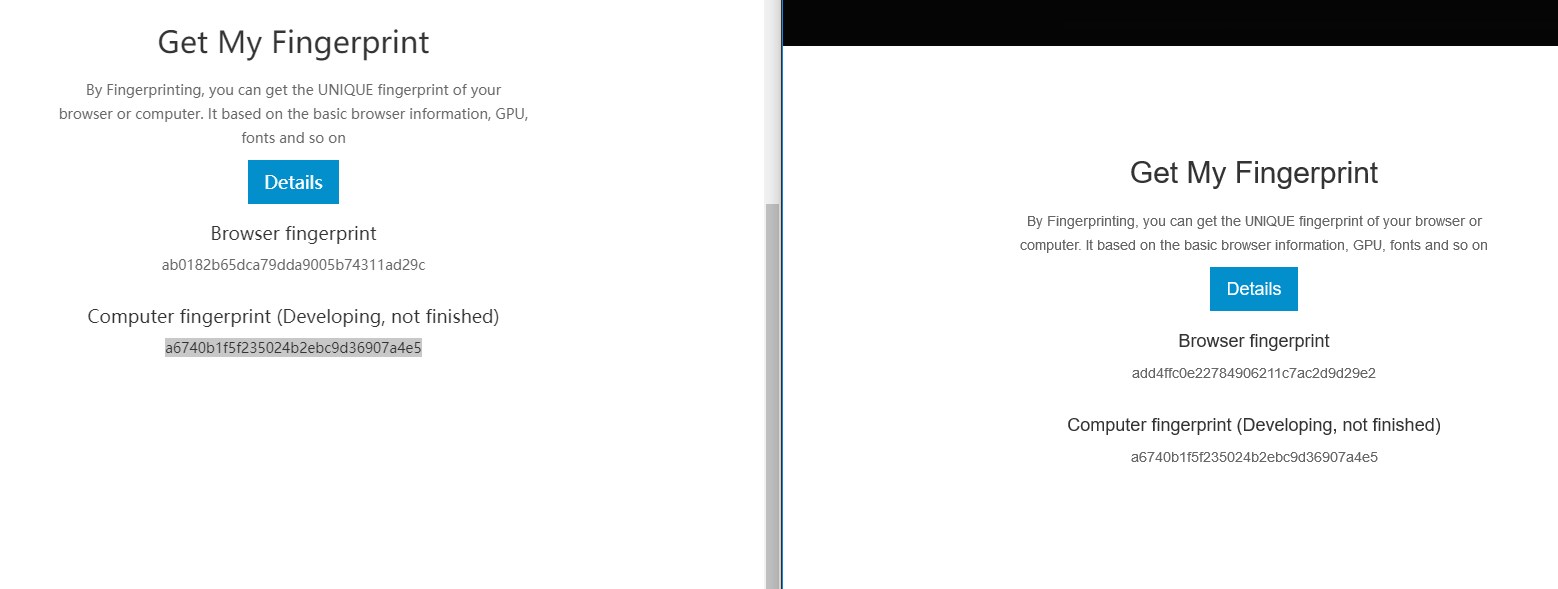
- 不同ip,同一浏览器(Chrome)
挂上代理后
不挂代理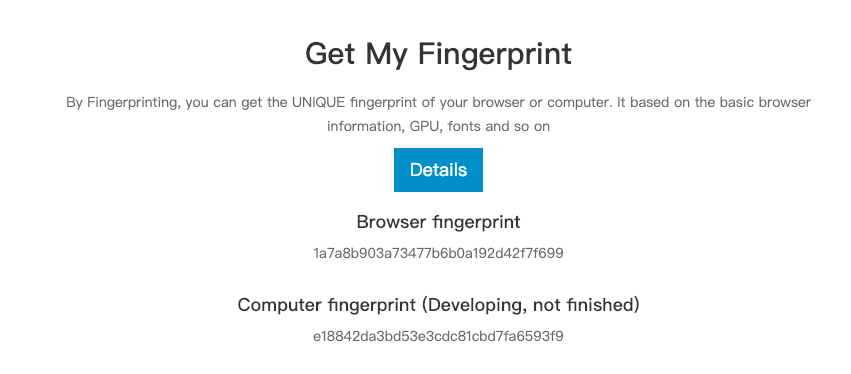
发现识别成功。
后记
进行跨浏览器设备指纹识别依旧是一个难题,论文提出了很多有趣的特征,我也不能一一阐述解释,并且由于这只是论文的demo,稳定性不够强可以理解,这可以为我们后续工作做一些启发与指引。